Adding a New On-Call Assignment
A new on-call assignment can be added by selecting the day(s) and specifying an individual.
1. Access Smart Web.
2. Choose the On-Call tab.
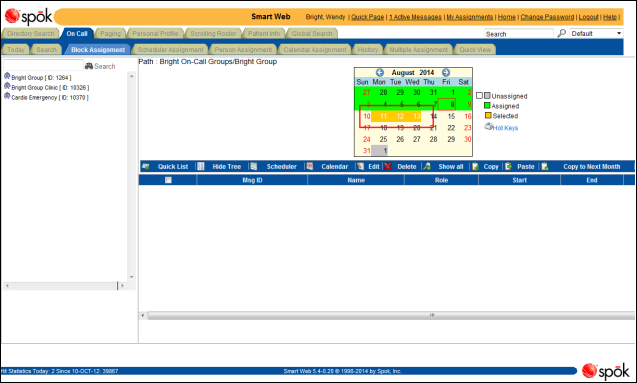
3. Choose the Block Assignment tab. Log in if you are required to do so. The Block Assignment screen displays.
4. Search for the on-call group to which you want to schedule an assignment. For information about searching for an on-call group, please refer to Displaying the On-Call Assignments for an On-Call Group in the Block Scheduler.
5. Choose the day for which an on-call assignment should be made. The selected day displays in orange. More than one day can be selected by simultaneously pressing <CTRL> and clicking on the desired days.
NOTE: Other short cuts for selecting more than one day are available using the hot keys. The list of hot keys is available by holding the cursor over the Hot Keys link in the screen. For detailed information about the hot keys, please refer to Working with the Block Scheduler Hot Keys.
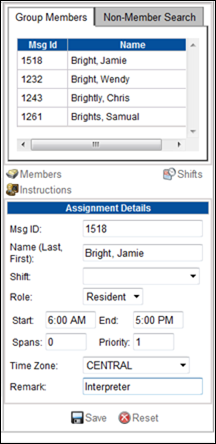
6. Specify the individual to which the shift should be assigned. You can search for either a member or non-member of the on-call group. You may have to scroll to the right of the screen to display the member selection screen.
Selecting an On-Call Group Member
a. Click on the Group Members tab to display the default list of on-call group members.
b. Double-click on a name in the list. The Msg ID and Name fields in the Assignment Details section are populated with the messaging ID and name for the selected individual.
Searching for a Non-Member
You can search for a non-on-call group member by name, messaging ID, or pager ID.
a. Click on the Non-Member Search tab to display the non-member search screen.
b. An individual can be searched for by entering a complete or partial search string in the Search field. You can search for a non-on-call group member by name, messaging ID, or pager ID.
c. Click the Search button. The search results display in the results section.
d. Double-click on a name in the list. The Msg ID and Name fields in the Assignment Details section are populated with the messaging ID and name for the selected individual.
7. Specify a shift. Choose a previously created shift from the Shift list box, or enter a start and end time for the shift in the Start and End fields. If a shift was selected from the Shift list box, the Start and End fields are populated with the start and end times for the shift. The times can be manually updated if needed.
8. From the Role list box, select a role that describes the person’s job function. The list of options is derived from the roles assigned to the on-call group. Selecting a role is optional.
NOTE: This feature is configurable and may not be available in your system.
9. From the Time Zone list box, choose the time zone in which the person assigned to the shift will be working.
10. If the shift spans more than one day, enter the appropriate number of days. One day is each time the shift covers midnight.
11. Enter the priority for the shift assignment in the Priority field. The field is populated with the shift priority by default, if a priority was assigned to the shift.
By default, the shift assignment is given the same priority as that assigned to the shift. If you want to change the priority for the shift assignment, change the entry in the Priority field. The priority displays in the calendar.
The shift assignment priority is used when more than one individual is on-call for the same time. The person or function with the highest priority is paged. The highest priority is “1”. If more than one individual is assigned to the same time but priorities are not assigned, the first person or function in the list is paged.
12. Enter any remarks or notes in the Remark field.
13. When the changes are complete, click the Save button. A message dialog displays.
14. Click the OK button to close the dialog. The calendar is updated with the changes.